Depending on your screen size you may wish to switch Outlook 2013 in to “Compact View”. Switching to compact view will free up more screen space which is great for reading on Windows Tablets. You may also find that after you’ve installed Outlook 2013 on a table that it has automatically defaulted to Compact View and you wish to restore it back to the normal Outlook layout.
Outlook 2013 Compact Navigation
The first thing you can adjust is the Outlook 2013 Navigation bar down the bottom left hand side to compact view. To do this:
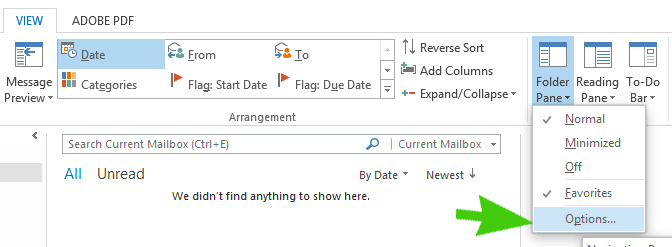
Step 1. Click on View
Click on the View tab on the ribbon up the top.
Step 2. Located the Compact View Options
Click on “Folder Pane” and then click on “Options”
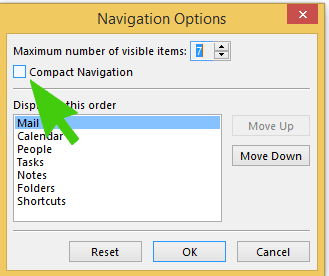
Step 3. Select Compact Navigation
Click the “Compact Navigation” check box and then click on ok.
You will now notice that the Navigation bard down the bottom is in compact view.
Outlook 2013 Compact Ribbon
The next item to take care of is changing the Outlook Ribbon to Auto hide when we’re not using it. This one is easy, all you need to do is click on the little arrow on the bottom left hand side of the ribbon and it will leave the headings for the tabs. When you click on a tab the full ribbon will come in to view again.
If you want to take it one step further you can also click on the Reading Pane along with the To-Do Bar and turn these off as well.
Conclusion
Changing the settings in Outlook 2013 to “Compact View” can be a great way of maximising your screen real estate particularly if you’re using a tablet like the Surface.


