Here’s how to add an Additional RDP Port to Windows 10. Alternatively, here are the instructions if you are just looking to change the RDP port. Whilst these instructions were written for adding an additional RDP port to Windows 10 they also apply to most other version of Windows such as Windows 8 and Windows 7.
Step 1
Open up the Registry Editor (instructions)
Step 2
Browse to the following registry key
HKEY_LOCAL_MACHINE\SYSTEM\CurrentControlSet\Control\Terminal Server\WinStations\RDP-Tcp
Step 3
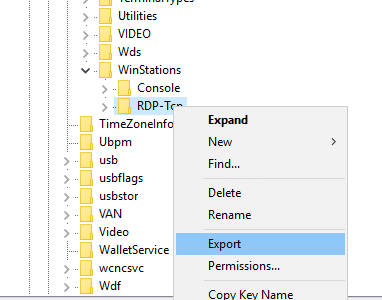
Right Click and choose export – save the file on your computer – give it a name like RDP-TCP-2
Step 4
Close the Registry Editor
Step 5
Right click on the file you saved and click on Edit
Step 6
As per the picture below change the key from:
HKEY_LOCAL_MACHINE\SYSTEM\CurrentControlSet\Control\Terminal Server\WinStations\RDP-Tcp
to
HKEY_LOCAL_MACHINE\SYSTEM\CurrentControlSet\Control\Terminal Server\WinStations\RDP-Tcp-2
Step 7
Close Notepad
Step 8
Double click on your saved RDP-TCP-2 registry file to import the key back in to the registry
Step 9
Open the Windows Registry Editor Again. We will now change the Port for our new key
Step 10
Browse to our new Key which we just imported. i.e.
HKEY_LOCAL_MACHINE\SYSTEM\CurrentControlSet\Control\Terminal Server\WinStations\RDP-Tcp-2
Step 11
Right Click on Port Number and choose Modify
Step 12
Click on the Decimal radio button
Step 13
Change the Port Number to the desired value and click on OK.
Step 14
Close the Windows Registry and restart the computer
Step 15
You can now test out the new RDP port which you’ve just added to the computer.
Note: If you’re having issues connecting after adding the new RDP Port to the Windows Registry please follow these RDP Troubleshooting tips.


YES, you guys rock. Thankyou, just what I was looking for. Simple now that you showed me how.
Muchas gracias!